In the second part of the post we’ll take the webhook and runbook we created in Part 1 and build on what we learned. This segment will focus on Azure Monitor Alerts and how to stitch together Signals with Action Groups to ultimately ensure that our VM is shutting down when it’s not in use or underutilized and like in Part 1 of the series we’ll do all this from the command line.
Problem
The problem is pretty basic… how do we stop Azure VMs from running if no one is actually using them? There are a few costs cutting measures you can take for this. Some folks setup schedules so that machines stop and start on a fixed schedule. But in this post we’ll actually use the monitoring metrics of the VM to stop it when it’s not being used.
Solution
In this post we’ll use the Azure Automation account from Part 1 to do all the heavy lifting for us. If you haven’t used it before Azure Automation is kind of like cron but on steriods. It can do things like basic scheduling but it also has the ability to alert on conditions and call automation jobs based on those alerts.
In the last post we looked at the overall solution we would implement in order to stop our VM when it was underutlized. Here is the high level of what we are doing.
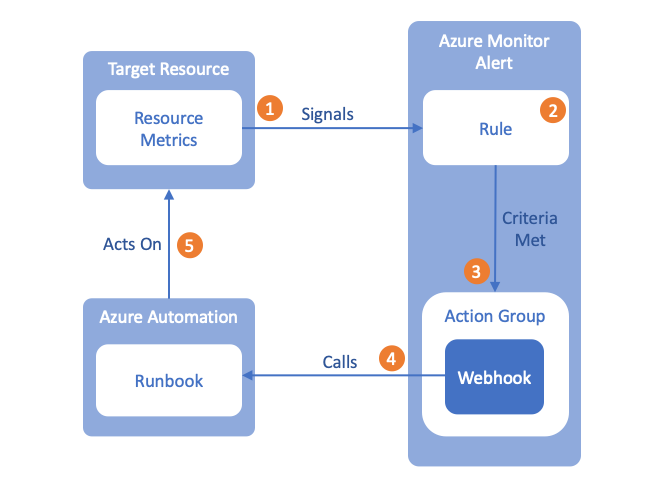
This is a depiction of the overall workflow but lets look at it in a little more detail.
- The target resource in this post is a VM called myHappyVM from the terminal commands above. This VM is emitting loads of signals to Azure Monitor from the platform, Activity Logs or Application Insights, signals like Available Memory, Network In, Network Out, Power Off VM, Deallocate VM, etc
- We’ll eventually create a Rule that will be applied to these incoming signals and evaluated against.
- When the Rule’s criteria is met it will call an Action Group that contains a webhook we’ll create in this post
- The webhook will then call an existing Runbook that has logic to stop the VM that emitted the signal.
- The Runbook will then act on the Target Resource using data from the webhook to tell Azure instructions on what to do. In our case we’ll be stopping the VM but in some situations this could be to add VMs or deallocate infrastructure or any number of actions you could want applied to your cloud environment.
In Post 1 we did steps 4 and 5, in this post we’ll implement 1, 2 and 3 to have a complete solution for stopping our VM when it’s underutilized.
So What are Alerts?
Alerts proactively notify or take action when issues are found in your environment or application. The best place to start getting a better understanding of alerts is in the Azure Documentation. I’m not going to repeat what’s on that page but I will reproduce the key attributes of an alert rule:
- Target Resource - Defines the scope and signals available for alerting. A target can be any Azure resource like a VM, storage account or App Service plan.
- Signal - Emitted by the target resource. Signals can be metrics, activity logs, Application Insights or log. Think CPU utilization or Free Memory.
- Criteria - A combination of signal and logic applied on the target resource. ** Percentage CPU > 70% ** Server Resource Time > 4ms ** Result count of a log query > 100
- Action Group - This is a specific action that’s taken when the alert is fired. This could be an automation runbook, email and/or push notification
In Part 1 of this series we focused on the the Action Group part of the solution and how to create a webhook that could call a runbook that stops our VM.
If you are following along and want to implement the entire solution now would be the time to go back and work through the examples in Part 1 before starting the steps below. I will reference the names used in Part 1 of the series and not recreate those steps here.
Create an Action Group to call our Webhook
In Part 1 of this post we created our webhook and generated a URI and stored it in the $WEBHOOL_URL environment variable. Hopefully you still have this in your session because these aren’t visible after creation because they contain a token in the URL.
Using this URL we can generate an action group like so…
>> az monitor action-group create \
>>   --action webhook stopvm "$WEBHOOK_URL" \
>>   --name MyActionGroup \
>>   --resource-group happy-rg
This action group’s sole purpose is to call the webhook we created in Part 1, but you can actually add multiple actions to this command if you want following the pattern “–action type name data”. So if we wanted to add an email as an action we’d have…
>> az monitor action-group create \
>>   --action webhook stopvm "$WEBHOOK_URL" \
>>   --action email admin "brent.mcconnell@microsoft.com" \
>>   --name MyActionGroup \
>>   --resource-group happy-rg
Create an Alert and Criteria
Now that we have our action group created we’ll create an Alert with criteria. In this example we’ll look at a 15m window to see if the average CPU has been below 5% during that period. You may need a larger window or want to bump the average cpu up. This may take some trial and error to find the right criteria that works for you and your team but it will be worth it.
>> HAPPYVM_ID=$(az vm show \
>>   --name myHappyVM \
>>   --resource-group happy-rg \
>>  --query id -o tsv)
>>
>> az monitor metrics alert create
>>   --name lowcpu \
>>   --resource-group happy-rg \
>>   --scopes $HAPPYVM_ID \
>>   --condition "avg Percentage CPU < 5" \
>>   --window-size 15m \
>>   --action MyActionGroup  \
>>   --description "stopvm"
>>
>> az monitor metrics alert list  \
>>   --resource-group happy-rg -o table
>>
A metric alert that’s in a “Fired” state would not trigger again until it’s resolved. This is done to reduce noise. Resolution happens automatically after 3 healthy evaluations of your condition (evaluations where the condition isn’t breached), and there’s no way to manually change the monitor condition to “Resolved”.
Summary
And that’s it. If you completed all the steps from Part 1 and Part 2 of this post you should now have an active alert rule on your myHappyVM that is monitoring it for low cpu usage and shutting it down if it is not used during a 15m window. Again, you may have to tweak the cpu percentage and/or the window size to get something that makes sense for how your VM is used but these are the basic steps you’ll need to get your VMs stopped and save you some money!