Sometimes it can be very beneficial to your budget to shutdown your VMs when they are idle or underutilized. In many cases there might be alternative strategies for processing workload like VM scalesets or Azure Functions that should be explored but in some situations shutting down an existing VM can make a lot of sense. In this part 1 of a 2 part series we’ll look at Azure Monitor and what Alerts are and we’ll even explore how to make REST API calls from the az command line. All this leading to part 2 where we put everything together to stop VMs based on a signal sent from Azure Monitor related to CPU usage.
Problem
The problem is pretty basic… how do we stop Azure VMs from running if noone is actually using them? There are a few costs cutting measures you can take for this. Some folks setup schedules so that machines stop and start on a fixed schedule. But in this post we’ll actually use the monitoring metrics of the VM to stop it when it’s not being used.
Solution
In this post we’ll lean on Azure Automation to do all the heavy lifting for us. If you haven’t used it before Azure Automation is kind of like cron but on steriods. It can do things like basic scheduling but it also has the ability to alert on conditions and call automation jobs based on those alerts.
Setup an Azure Automation Account
If you don’t already have one you’ll want to setup an Azure Automation account. You should note that if you need to run jobs on a schedule or via a webhook you’ll need to create a “Run As” account and this will require Subscription Owner permissions. If you are doing this in your MSDN subscription you’ll be all set but if you are working on a project in a shared subscription you may need to have the Owner of the subscription help you with this first part.
Let’s setup a demo area where we can do this work and not be distracted by other resources and objects in our resource group.
>> # Create a Resource Group
>> az group create \
>>   --name happy-rg \
>>   --location eastus
>>
>> az automation account create \
>>   --automation-account-name myAutomationAccount \
>>   --location eastus \
>>   --sku Basic \
>>   --resource-group happy-rg
>>
>> # Create a basic VM to experiement with
>> # This command relies on automatic SSH authentication
>> az vm create \
>>   --name MyHappyVM \
>>   --resource-group happy-rg \
>>   --image UbuntuLTS
Once all this is created you’ll still need to login to the portal (I know, I know) and create a “Run As” account in the Automation Account we created above. There is some good documentation on this step so I won’t repeat it here. We could do this step via the REST API as well but this post is already going to be pretty long, perhaps in a future post we’ll take a stab at creating the Run As account in Automation.
Azure Automation
Azure Automation is an automation and configuration service for Azure and even non-Azure environments. The main features you get are process automation, configuraiton management and update management and it works across both Windows and Linux environments.
Basic Vocabulary
Here is the basic vocabulary we’ll use in this blog.
- Target Resource - Defines the scope and signals available for alerting. A target can be any Azure resource like a VM, storage account or App Service plan.
- Signals - Emitted by the target resource. Signals can be metrics, activity logs, Application Insights or log. Think CPU utilization or Free Memory.
- Rule - A combination of signal and logic applied on the target resource. ** Percentage CPU > 70% ** Server Resource Time > 4ms ** Result count of a log query > 100
- Actions - This is a specific action that’s taken when the alert is fired. This could be an automation runbook, email and/or push notification
- Runbook - This is the program executed by the action (ie webhook) to take some action. In our case in this blog the action will be to Stop the VM that was being monitored
Solution Overview
From a high level what we want is for Azure Monitor to monitor a VM and fire an alert when the VM is underutilized. The alert will call a webhook that we create that triggers a runbook to stop the VM.
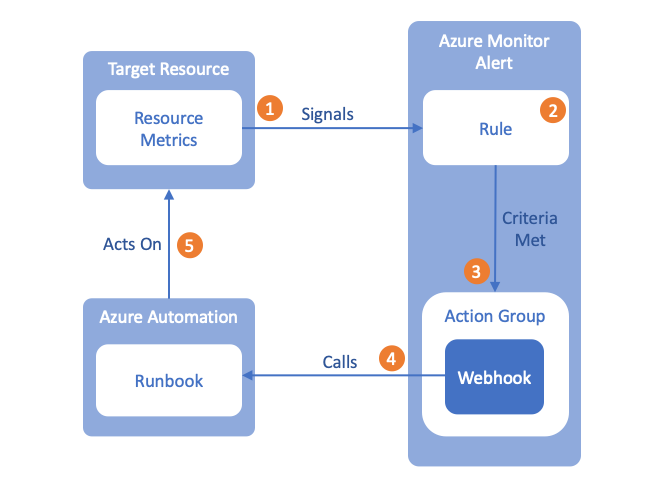
This is a depiction of the overall workflow but lets look at it in a little more detail.
- The target resource in this post is a VM called myHappyVM from the terminal commands above. This VM is emitting loads of signals to Azure Monitor from the platform, Activity Logs or Application Insights, signals like Available Memory, Network In, Network Out, Power Off VM, Deallocate VM, etc
- We’ll eventually create a Rule that will be applied to these incoming signals and evaluated against.
- When the Rule’s criteria is met it will call an Action Group that contains a webhook we’ll create in this post
- The webhook will then call an existing Runbook that has logic to stop the VM that emitted the signal.
- The Runbook will then act on the Target Resource using data from the webhook to tell Azure instructions on what to do. In our case we’ll be stopping the VM but in some situations this could be to add VMs or deallocate infrastructure or any number of actions you could want applied to your cloud environment.
So in this post we’ll actually look at steps 4 and 5 primarily. This will give us the necessary components to trigger with an Alert rule so in essence we’ll be working backwards to complete the solution.
Create a Runbook To Stop VM
So first we’ll need a Runbook to call. In this step we are going to use a basic Powershell script to login to Azure and use the AzureRm modules that come preconfigured in an Automation account to stop the VM. It would be awesome if we could use Bash or Python for this part of the solution but unfortuately those options aren’t available to webhooks just yet. For more info you can check out this documentation on automating workflows with webhooks. This diagram outlines the basic components of what we are doingk
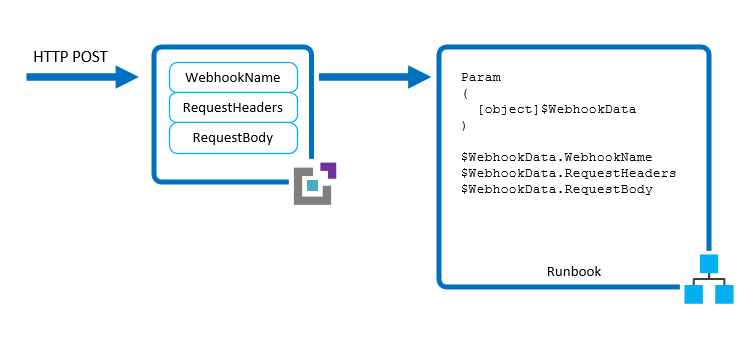
Below is a simple Powershell script that will stop a VM using some data passed in via the webhook. You can definitely add more logic to this especially around verification of who is calling the runbook or what schema is be used but this should get us started. Using the script below create a file on your local harddrive called stopvm.ps1.
Once you have a file on your local harddisk called stopvm.ps1 you can create an runbook in the Automation Account we created earlier using…
>> # Create the runbook object
>> az automation runbook create \
>>   --automation-account-name myAutomationAccount \
>>   --name StopVm \
>>   --resource-group-name happy-rg \
>>   --type Powershell
>>   --location eastus
>>
>> # Add the script content to the object
>> az automation runbook replace-content \
>>   --automation-account-name myAutomationAccount \
>>   --resource-group-name happy-rg \
>>   --name StopVM --content @./stopvm.ps1
>>
>> # Publish the runbook
>> az automation runbook publish \
>>   --automation-account-name myAutomationAccount \
>>   --name StopVm
>>   --resource-group-name happy-rg
>>
>> # List the runbooks out
>> az automation runbooks list \
>>   --automation-account-name myAutomationAccount
>>   --resource-group-name happy-rg
At this point we now have a working runbook in our Automation Account. Our next step is to plumb it up for use.
Create a Webhook to call the Runbook
Unfortunately the az cli doesn’t yet contain functionaliy for directly creating a webhook and connecting it to a runbook… at least that I could find. But that’s not a big deal anymore. Since az cli version 2.0.67 we have been able to call the REST api from the cli tool directly and it takes care of all the heavy lifting for us.
Case in point. Let’s grab a list of resource groups in our subscription using a REST api call instead of az group list
>> az rest --method get \
>>  --url https://management.azure.com/subscriptions/\{subscriptionId\}/resourcegroups\?api-version\=2020-10-01
Pretty easy… if you have the documentation available. az cli will even get a bearer token for you and fill in your subscriptionId.
Creating a webhook and connecting it to our runbook is a 2 step process via the REST API…
- Generate a webhook URI
- Connect the URI to our runbook
First let’s generate the URI and save it to an environment variable.
export RG=happy-rg
export AUTO=myAutomationAccount
URL=$(az rest --method post --url https://management.azure.com/subscriptions/\{subscriptionId\}/resourceGroups/${RG}/providers/Microsoft.Automation/automationAccounts/${AUTO}/webhooks/generateUri\?api-version\=2015-10-31)
export WEBHOOK_URL=$(echo $URL | tr -d '"')
echo $WEBHOOK_URL
Now we have an environment variable called $WEBHOOK_URL that contains the generated uri we can use for our webhook.
The $WEBHOOK_URL that is in this session contains a token that will not be accessible from the az cli again. If you are working through this blog post know that you’ll need to store the $WEBHOOK_URL somewhere before you close your session if you plan to resume your work at a later date.
For the next API call we need a bit of JSON to pass in the body of the POST request.
>> WEBHOOK_NAME=StopVMWebhook
>> RUNBOOK_NAME=StopVM
>> DAYS_TILL_EXPIRE=90
>> EXPIRY_DATE=$(date -v +${DAYS_TILL_EXPIRE}d "+%Y-%m-%d")
>> export JSON=$(cat <<EOF
>> {
>>   "name": "${WEBHOOK_NAME}",
>>   "properties": {
>>     "isEnabled": true,
>>     "expiryTime": "${EXPIRY_DATE}",
>>     "uri": "${WEBHOOK_URL}",
>>     "runbook": {
>>       "name": "${RUNBOOK_NAME}"
>>     }
>>   }
>> }
>> EOF
>> )
>>
>> # Call Rest API
>> az rest --method PUT \
>>   --body $JSON \
>>   --url https://management.azure.com/subscriptions/\{subscriptionId\}/resourceGroups/${RG}/providers/Microsoft.Automation/automationAccounts/${AUTO}/webhooks/${WEBHOOK_NAME}\?api-version\=2015-10-31
And that is that!! We now have a webhook that we can call to execute the StopVm runbook.
Test Our Work
Now that we have a webhook connected up to our runbook and a VM we created earlier, let’s test our webhook and see if it works as expected. For this we’ll use curl to do a POST to our webhook and include a couple of pieces of info that we know our runbook is expecting. If this part of the post doesn’t make sense you can review the runbook we created earlier and look at the logic we used. We are using a bit of JSON that represents the bare minimum of the info we’ll receive from a live webhook when it’s fired.
{
  "schemaId":"AzureMonitorMetricAlert",
  "data":
  {
    "context":
    {
        "resourceGroupName":"happy-rg",
        "resourceName":"MyHappyVM",
        "resourceType":"Microsoft.Compute/virtualMachines"
    },
    "status": "Fired"
  }
}
Put this bit of json in a file called body.json and save it in your terminal session then use the command below to test our webhook.
>> # Call our webhook with a bit of JSON to tell it what resource to act on
>> curl -d @body.json -X POST $WEBHOOK_URL
>> {"JobIds":["8b9349e3-a2f8-433e-8b97-0583a9fd5e50"]}
Summary
We did quite a bit in this post and we are only half way there. But the rest is pretty easy and we’ll take that up in the next post. For those of you paying attention you’ll notice that the webhook doesn’t have any security on it. This means that someone who determines you URI could also stop your VM… not what you want. The documentation above touches on this so I’m going to reference here gain. It’s not too hard you’ll just need to include some logic in your runbook to ensure it’s being called from your webhook.