In this post we’ll take a look at what it takes to connect to an Azure DevTest Lab when you only have outbound access to connect to resources on port 443. I was recently working with a customer who could only connect outbound on port 443 and they wanted to use Remote Desktop Protocol (RDP) to connect to a Windows VM running in a DevTest Lab. There are a few different ideas that we came up with but using SSH was a quick and dirty solution that got them connected quickly.
Problem
Azure DevTest Labs optionally provide VM resources on a shared external endpoint using Network Address Translation (NAT). This means that instead of connecting to port 22 or 3389 on a public IP address you’ll be given a random port number on a shared external endpoint that you use to access your VMs. This works great when you aren’t in a locked down environment. Unfortunately, if you are in an environment that doesn’t allow traffic on those random ports it can be a challenge to gain access to your DevTest environment. This post provides a quick and dirty way to get up and running quickly using SSH to a proxy server to access your DevTest Lab using only outbound 443
Basic Solution Requirements
- Listen on port 443 of a Linux host in Azure so that outbound users can connect
- Encrypt all traffic between remote user and Azure
- Proxy traffic from Linux host to the Windows workstation on the DevTest Labs port for RDP
Solution
In this post we are only going to look at using SSH as a tunnel for RDP in the specific scenario described above… albeit where 443 is only allowed outbound from a network. If you want to know more about Azure DevTest Labs there are some really good tutorials and documentation available:
The thing to note about Azure DevTest Labs is that by default they will use NAT to limit the number of public IP addresses in your lab. They can be configured with public addresses as well but in some cases, like mine, the customer wanted to leave the existing NAT rules in place and still be able to connect on outbound 443…
Enter SSH Tunnels
Before we get started I do want to mention that this is probably not the enterprise solution you are looking for to enable this type of access. If you want something more permanent I would look at either:
There is even a specific guide for setting up remote desktop gateway for DevTest Labs here.
Now that the disclaimer is out of the way we can look at how to use SSH to connect. Every Linux box comes with SSH. It is the default connection method when connecting remotely to a Linux VM. What you may not know is that SSH can be used as an encryption tunnel, much like a poor man’s VPN, to send arbitary data over an encrypted channel. For more on SSH Tunnels.
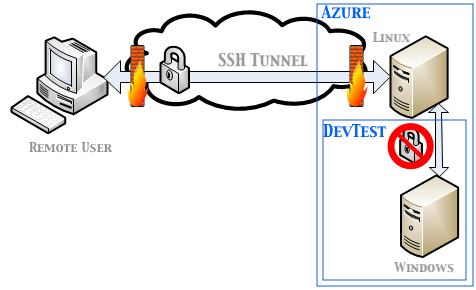
What we want to do is setup a secondary Linux VM in Azure to act as a proxy to allow us
to connect to our DevTest Lab VMs. The following illustration depicts the
basics of what we’ll be doing.
Linux Proxy Server Setup
We’ll need to setup a Linux host in a resource group so that we can connect to it’s public IP address. We’ll also want to make sure it’s on a subnet that is different from the one our DevTest VMs are sitting on. In my case my VMs were on 10.0.0.0/16 so I created the Linux VM on 10.10.0.0/16.
>> az group create --name rdpproxy -l eastus
>> az network vnet create -g rdpproxy --name proxyvnet --subnet-name proxysubnet --address-prefix 10.10.0.0/16
>> az vm create -n vmproxy -g rdpproxy --image UbuntuLTS
Now that we have a resource group and a Linux VM let’s make sure that our new VM can communicate with the DevTest VMs. In this case I used VNet Peering to connect the two VNets so that they could communicate with each other. There is a great tutorial that will walk you through this so I’m not going to cover it here.
Once we’ve established connectivity to our DevTest Lab VMs we’ll need to have our Linux VM listen on port 443 for SSH traffic so that outbound traffic will be allowed to connect from the remote user. This is one of the really nice things about the SSHD daemon on Linux because it will listen on multiple ports. All you have to do is include the additional port in the sshd_config file.
On most variants of Linux the sshd_config file is in /etc/ or /etc/ssh. At the top of the file include an addtional Port and restart the service.
From /etc/ssh/sshd_config on Ubuntu 16.04...

# What ports, IPs and protocols we listen for
Port 22
Port 443
# Use these options to restrict which interfaces/protocols sshd will bind to
#ListenAddress ::
#ListenAddress 0.0.0.0
...
Now that our Linux proxy is configured to communicate with the DevTest VMs via VNet Peering and we have our SSH service listening on the additional port of 443 we can now use the ssh client of our choice to establish our SSH tunnel.
Client Configuration
I’m on a Mac so I’ll be using the embedded ssh client available on MacOS. If you are on a Windows workstation you can use one of many SSH clients… there are several.
So let’s start by looking at the actual command I used (except for my Linux public IP which I’ve masked).
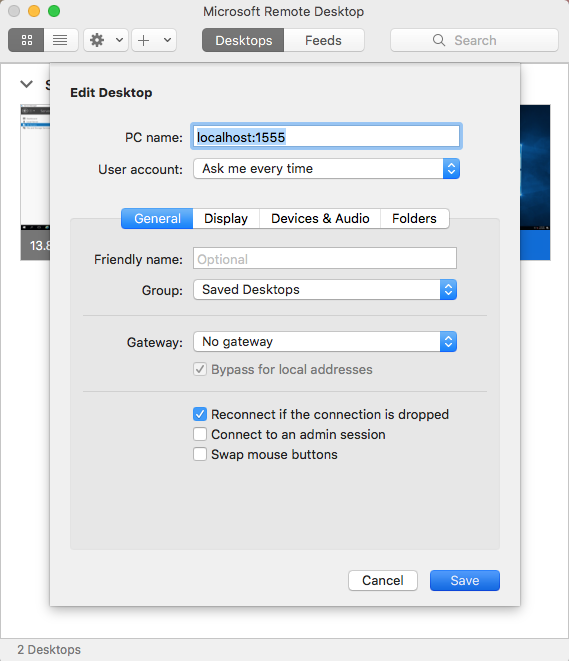
ssh -L 1555:10.0.0.5:3389 bmcconnell@13.72.yy.xxx -p 443
This basically says open an SSH connection to the server at 13.72.yy.xxx using port 443. Additionally establish a local connection on my SSH client machine that is bound to port 1555 that will proxy traffic through the SSH tunnel to the RDP service running on 3389 that is at 10.0.0.5
NOTE: Notice we didn’t have to use the external endpoint of the NAT’d RDP service since we are using VNET Peering to connect our internal networks together.
So let’s break this down the SSH command into more understandable terms:
ssh -L <localhost port>:<Windows VM address>:<RDP Port> <username on proxy>@<ip of proxy> -p <Linux SSH port>
So depending on how you have your authentication setup on the Linux proxy server you should either get a prompt (ssl cert) or a password prompt at this point and once you’ve authenticated you’ll be returned to the prompt on the Linux proxy server. However, this is where the magic starts. If you look on your Mac workstation (or Windows) for ports that are in LISTEN mode you’ll see that localhost is listening on 1555
>> netstat -an | grep 1555
tcp4       0      0  127.0.0.1.1555         *.*                    LISTEN
tcp6       0      0  ::1.1555               *.*                    LISTEN
This my friends is the SSH tunnel we’ve been working to build. Now we can use the Windows RDP client from Mac to connect to localhost:1555 and we’ll be transported to our Windows VM’s Desktop.
Summary
So that’s it, a quick and dirty way to use an SSH tunnel to connect to your Windows desktop using RDP. It works but there are some caveats. You have to create a new tunnel for each Windows VM you want to connect to using a different host port. So for instance if you wanted to connect to a second Windows VM you’d have to setup a second tunnel using another localhost port like 1556. You can still use the same port on the Linux proxy server but you’ll now have 2 tunnels from your workstation to the proxy server.
I’ll admit this method of connecting is a quick and dirty hack and I don’t recommend this for anything but a temporary way to connect to your DevTest Labs. Again, if you are looking for an enterprise solution check out Apache Guacamole or Microsoft RDS. Also remember that you can assign public IPs to your DevTest Labs, it’s just not the default pattern.