Today we are going to look at what it takes to install a custom certificate in an Azure CDN. In my last post I created a certificate using the Let’s Encrypt process that we’ll use in Azure CDN. Some folks may have a specific issuer they want to use or perhaps they want full control over how the certificates are issued. For whatever reason they want to bring their own cert (BYOC), this post should help navigate the pecularities of getting it installed.
Problem
We need to install a custom certificate that we bring to Azure in our CDN (content distribution network).
Solution
Setup KeyVault
The first thing to note about installing a certificate into an Azure CDN is that you need an Azure KeyVault that the CDN can access the certificate from. For this post I’ll create a new keyvault
>> az keyvault create --name kv-azurepatterns \
    --resource-group azurepatterns

Location    Name              ResourceGroup
----------  ----------------  ---------------
eastus      kv-azurepatterns  azurepatterns
The next important point to understand is that the CDN needs Read access to the secrets in the keyvault. Microsoft offers this little tidbit of advice when you are in the portal installing a certificate for a custom domain:
You need to setup the right permissions for CDN to access your Key vault: 1) Register Azure CDN as an app in your Azure Active Directory (AAD) via PowerShell using this command: New-AzureRmADServicePrincipal -ApplicationId "205478c0-bd83-4e1b-a9d6-db63a3e1e1c8". 2) Grant Azure CDN service the permission to access the secrets in your Key vault. Go to “Access policies” from your Key vault to add a new policy, then grant “Microsoft.Azure.Cdn” service principal a “get-secret” permission.
So hopefully this worked for everyone but me but in my case I got the following error message when I ran this with az. I also confirmed I got the same error message in Powershell… bummer!
>> az ad sp create --id 205478c0-bd83-4e1b-a9d6-db63a3e1e1c8
Insufficient privileges to complete the operation. Request principal is not the owner.
If I take a closer look a at that particular application id we get the following:
>> az ad sp list --output json \
    --filter "AppId eq '205478c0-bd83-4e1b-a9d6-db63a3e1e1c8'" \
    --query "[].[displayName,objectType,servicePrincipalType,servicePrincipalNames]"

[
  [
    "Microsoft.Azure.Cdn",
    "ServicePrincipal",
    "Application",
    [
      "https://microsoft.onmicrosoft.com/033ce1c9-f832-4658-b024-ef1cbea108b8",
      "205478c0-bd83-4e1b-a9d6-db63a3e1e1c8"
    ]
  ]
]
So the application exists and is a Service Principal that I can view. Let me go ahead and see if what happens if I grant that particular service principal access to my KeyVault.
>> az keyvault set-policy --name "kv-azurepatterns" \
    --spn 205478c0-bd83-4e1b-a9d6-db63a3e1e1c8 \
    --secret-permissions get

Location    Name              ResourceGroup
----------  ----------------  ---------------
eastus      kv-azurepatterns  azurepatterns
And Voila, that works so far. The next step will be to add my certificate from the Let’s Encrypt post and see if the CDN can actually access the certificate.
I’ll spare you the next few details but needless to say that Azure CDN requires the cert and key be in pfx format which I can appreciate but wish had been documented somewhere easily accessible. Also noteworthy is that the certificate needs to have all the intermediate certs merged in. In you have several certificates you your cert chain just use a text editor to merge them into a single file and follow the order of the certificate chain from your SSL certificate at the top of the file to the root CA certificate at the bottom. Our Let’s Encrypt certificate already comes complete in the fullchain.pem so we’re good there.
To create a pfx formatted cert we use openssl. Also important to note is that when prompted for a Passphrase DON’T enter one. There is no way to enter the PassPhrase to Azure CDN so it can access it.
>> sudo openssl pkcs12 -export \
    -out fullchain.pfx \
    -inkey privkey.pem \
    -in fullchain.pem

Enter Export Password:
Verifying - Enter Export Password:

>> ls -la fullchain.pfx
-rw-r--r-- 1 user staff 4205 Jul 19 15:54 fullchain.pfx
We are now ready to add our brand spanking new certificate file to KeyVault. And this is where the next thing slowed me down :(. The application type must be set for the secret to application/x-pkcs12. Not a big deal, but again, wish it were more obvious without me banging my head (starting to hurt). So finally, ready to add my certificate. I’m going to use a secret since I already gave privileges for the CDN to access the secret store of my KeyVault.
>> az keyvault secret set --name azurepatterns-cert  \
    --vault-name kv-azurepatterns \
    --file fullchain.pfx \
    --encoding base64 \
    --desc "application/x-pkcs12"

ContentType           Value
--------------------  ----------------------------------------------------------------------------
application/x-pkcs12  NQIQaQIBAzCCEC8GCSqGSIb3DQEHAaCCECAEghAcMIIQGDCCCs8GCSqGSIb3DQEHBqCCCsAwggq8
                      AgEAMIIKtQYJKoZIhvcNAQcBMBwGCiqGSIb3DQEMAQYwDgQI8FNNA20WNOUCAggAgIIKiBZYFWiq
                      pMuVcPAXZvXMvlnLsORKHtxF9Mh9LWpCUpoisM2nhPRQvoi2G5BG84oKmYeWXeRJljwcRg3/DLmi
                      ...
Now the really bad news. At this point we can’t continue any longer with the az CLI. As of az version 2.0.67 the CLI doesn’t support the necessary parameters to attach our certificate to our domain… errrr! There are solutions, however. You have 2 options at this point:
- Login to the Azure Portal and enable the certificate in the UI
- Make a REST API call to the endpoint that the Azure Portal uses which should be… https://management.azure.com/subscriptions/$subscriptionId/resourceGroups/$resourceGroupName/providers/Microsoft.Cdn/profiles/$cdnProfileName/endpoints/$cdnEndpointName/customDomains/$cdnCustomDomainName/enableCustomHttps?api-version=2018-04-02
In a later post I may tackle the REST API since I plan to automate everything about azurepatterns.com but for now I’ll have to be content to use the UI.
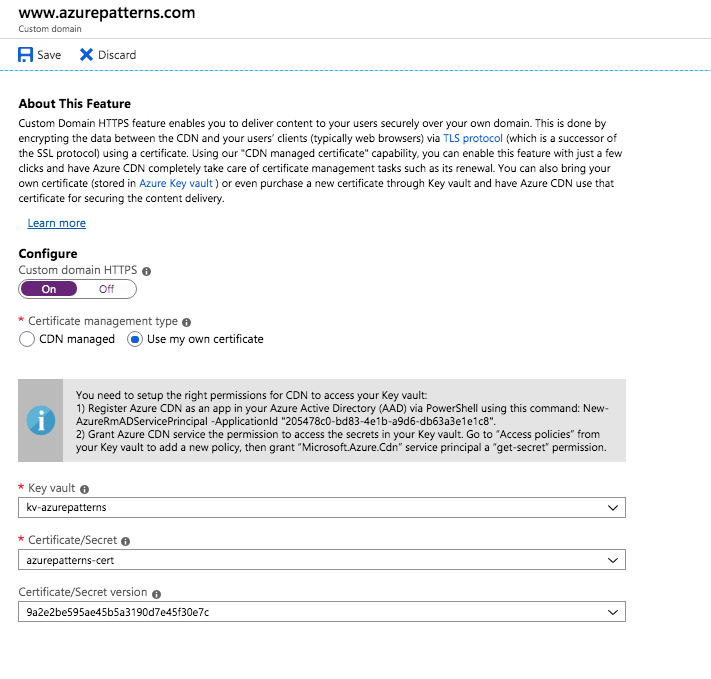 The rest is pretty straightforward from the UI. Find your custom domain and
select the option to Configure -> Custom domain HTTPS and chose Use my
own certificate. At this point be prepared to wait 12-16 hours because it
does take a long time to validate domain ownership and propagate the
certificate.
The rest is pretty straightforward from the UI. Find your custom domain and
select the option to Configure -> Custom domain HTTPS and chose Use my
own certificate. At this point be prepared to wait 12-16 hours because it
does take a long time to validate domain ownership and propagate the
certificate.